No-Bake Peanut Butter Oat Cups – Easy Recipe
Discover the delightful world of no-bake treats with these peanut butter oat cups, a perfect blend of flavors and textures. This easy-to-make dessert is ideal for those looking for a quick, healthy snack without the need for an oven. Packed with rich, layered flavors, these cups have become a favorite freezer snack, offering instant gratification anytime you crave something sweet.
The recipe requires just a few simple ingredients, including peanut butter, oats, and chocolate, making it a breeze to prepare. The combination of these ingredients creates a delicious treat that’s both satisfying and guilt-free. With a preparation time of just 10 minutes, you can have these ready to freeze in no time.
Key Takeaways
- Quick and easy no-bake dessert requiring only 10 minutes of prep time.
- Perfect for healthy snacks with rich, layered flavors.
- Ideal freezer treat for instant post-lunch gratification.
- Combines peanut butter, oats, and chocolate for a delicious taste.
- Free from oven requirements, making it hassle-free to prepare.
Introduction
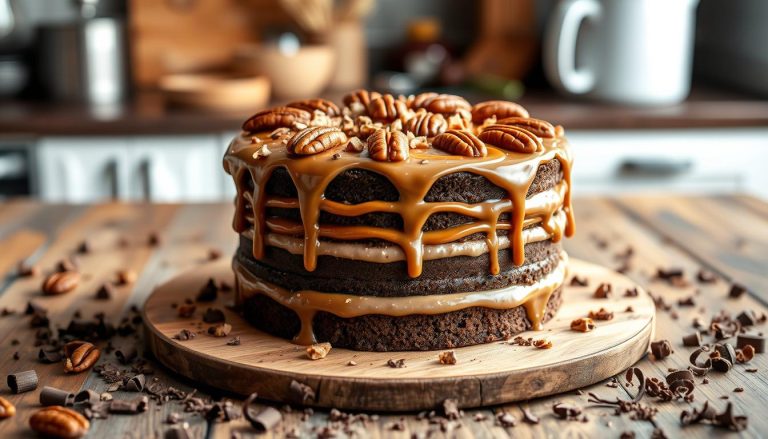
These no-bake treats are a game-changer for anyone who loves chocolate and peanut butter. They offer a perfect balance of flavors with three distinct layers that will satisfy your sweet tooth without any guilt.
Why You’ll Love These No-Bake Treats
No-bake desserts are loved for their simplicity and quick preparation. They require minimal ingredients and no cooking, making them ideal for anyone looking for a fast and delicious snack. The combination of chocolate, peanut butter, and oats in these treats creates a decadent yet healthy option that you can enjoy anytime.
Overview of a Quick and Healthy Snack
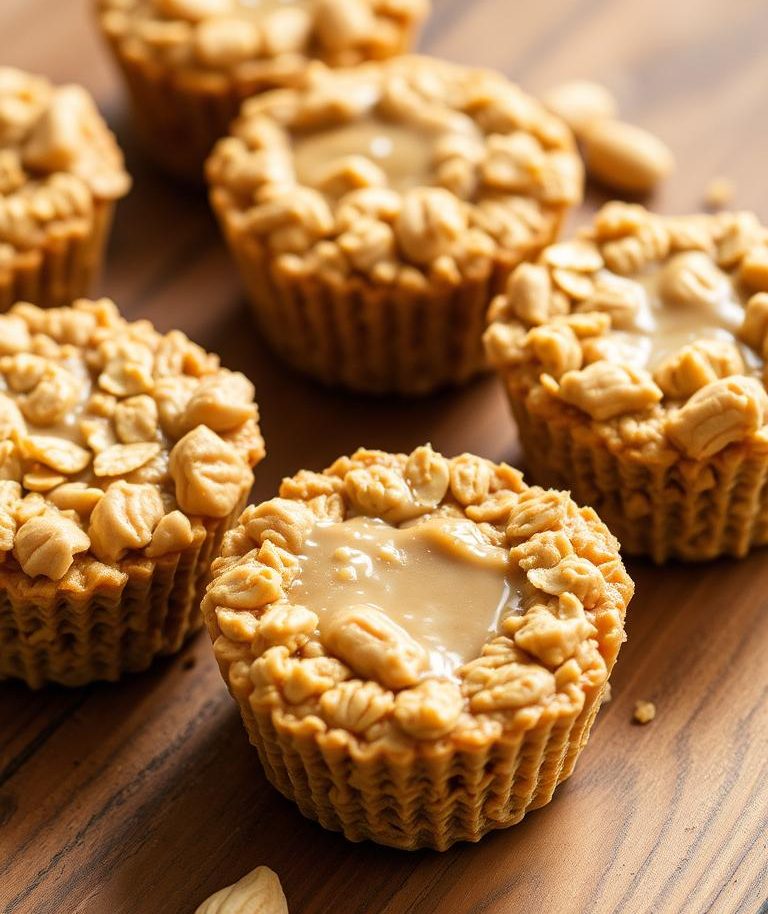
These treats are made in a muffin tin or silicone mold, making them versatile and easy to prepare. They are perfect for when you need a quick, nutritious snack without heating up your kitchen. The layered chocolate, peanut butter, and oat combination makes them stand out among other no-bake desserts, offering a delicious and healthy option for any time of the day.

Essential Ingredients and Equipment
To create these delicious treats, you’ll need a few simple ingredients and some basic kitchen tools. The right combination ensures the best flavor and texture.
Ingredient List and Measurements
Here’s a breakdown of what you need:
- 1 heaping cup of quick-cooking oats
- ½ cup of creamy peanut butter
- 1/3 cup of honey or maple syrup
- 1-2 tablespoons of chia seeds (optional)
- 2/3 cup of dark chocolate chips
- 1 tablespoon of coconut oil
- Mini chocolate chips for topping
These ingredients blend perfectly to create a rich, layered treat. You can also add a pinch of salt or a teaspoon of vanilla extract for extra flavor.
Recommended Tools and Muffin Tins
The right tools make preparation easy and efficient. Here’s what you’ll need:
| Ingredient/Tool | Measurement/Description |
|---|---|
| Quick-cooking oats | 1 heaping cup |
| Peanut butter | ½ cup |
| Honey or maple syrup | 1/3 cup |
| Dark chocolate chips | 2/3 cup |
| Coconut oil | 1 tablespoon |
| Muffin tin | Mini tin with liners or silicone mold |
Using a mini muffin tin with liners or a reusable silicone mold ensures easy removal and clean-up. A spoon and measuring cups are all you need for preparation.

Recipe Background and Health Benefits
These treats are crafted with wholesome ingredients, making them a nutritious dessert option. The combination of peanut butter oat layers and dark chocolate creates a delicious yet healthy snack.
Gluten-Free and Nutritious Features
The recipe uses naturally gluten-free ingredients, ensuring it’s accessible to those with dietary restrictions. Whole grains and natural sugars add fiber and nutrients, making it a satisfying choice. Coconut oil enhances the texture and provides health benefits.
Perfect for a No-Oven Dessert
Prepared in a muffin tin, these treats are easy to make without heating up your kitchen. Ideal for hot weather, they offer a refreshing dessert solution.
| Ingredient | Benefit |
|---|---|
| Coconut Oil | Enhances texture and adds health benefits |
| Peanut Butter | Boosts protein and flavor |
| Dark Chocolate | Rich in antioxidants |

Step-by-Step Recipe Process
Creating these delicious treats is straightforward with a few simple steps. The process involves layering ingredients in a muffin tin, with brief freezing intervals to set each layer perfectly.
Preparing the Oat Layer
Start by pressing a mixture of oats, peanut butter, and honey firmly into the bottom of your muffin tin. This creates a sturdy base for your dessert. Make sure to press down evenly for a consistent texture.
Assembling the Chocolate and Peanut Butter Layers
Melt chocolate chips with coconut oil until smooth. Pour this mixture over the oat layer and freeze for a few minutes to set. Next, spread a layer of peanut butter over the chocolate. Top with mini chocolate chips for a decorative finish.

Freezing each layer briefly ensures they set properly before adding the next, making the assembly process smooth and hassle-free.
Tips for Making No-Bake Peanut Butter Oat Cups
Mastering the art of creating these delicious treats involves a few expert techniques and smart hacks. Whether you’re a novice or an experienced cook, these tips will ensure your dessert turns out perfectly every time.

Expert Techniques for Best Texture
Achieving the ideal texture starts with your nut butter. Opt for a drippy consistency to ensure a smooth mixture. If it’s too thick, mix in a little oil to thin it out.
Next, consider blitzing your oats in a food processor for a finer texture. This step ensures the base layer holds together perfectly without being too chunky.
When melting chocolate, do it in short bursts in the microwave, stirring between each interval. This prevents burning and ensures a glossy finish for your dessert.
Time-Saving Hacks in the Kitchen
Pre-measure your ingredients before starting. This saves minutes and keeps the process efficient. Layer each component quickly to avoid melting issues.
For an extra-crisp base, chill the oat mixture in the freezer for a few minutes before adding the chocolate layer. This step ensures a clean break when serving.
| Tip | Benefit |
|---|---|
| Use drippy nut butter | Ensures smooth mixture |
| Blitz oats | Finer texture |
| Melt chocolate carefully | Prevents burning |
| Pre-measure ingredients | Saves time |
| Chill mixture | Crisp base |
With these expert tips and hacks, you’ll create a dessert that’s both delicious and visually appealing. Enjoy your perfect no-bake treat!
Creative Variations and Flavor Boosters
Elevate your treat game with these creative spins on the classic recipe. Whether you’re looking for a new flavor profile or a dietary adjustment, these ideas will inspire you to experiment and make the recipe your own.
Alternate Nut Butters and Add-Ins
Swap peanut butter with almond or cashew butter for a unique twist. These nut butters bring distinct flavors while maintaining the treat’s creamy base. For an extra kick, try adding a pinch of cinnamon or a handful of raisins to the mixture.
Integrate a drizzle of maple syrup for a touch of sweetness or add a sprinkle of cinnamon for warmth. These small additions can elevate the treat’s flavor profile, making each bite more exciting. Consider mixing in some mini chocolate chips or cacao nibs for a burst of flavor and texture.
For those with dietary restrictions, using sunflower seed butter offers a nut-free alternative. This variation is perfect for schools or workplaces with nut allergies. You can also adjust the proportions of ingredients to suit your taste preferences, creating a treat that’s uniquely yours.
Don’t forget to get creative with presentation! Press the mixture into a lined pan for bars instead of cups, or roll them into balls for bite-sized energy boosts. These variations not only diversify the treat’s appearance but also make them easier to share or store.
| Ingredient | Benefit |
|---|---|
| Cashew Butter | Smooth, creamy texture with a subtle sweetness |
| Mini Chocolate Chips | Adds bursts of chocolate flavor and texture |
| Cinnamon | Provides a warm, aromatic spice flavor |
| Raisins | Introduces natural sweetness and chewiness |
| Sunflower Seed Butter | Nut-free alternative for allergen-friendly option |
With these creative variations, you can tailor the recipe to your preferences and dietary needs. Experiment with different combinations to find your perfect treat!

Storage, Serving, and Nutritional Information
Proper storage is key to maintaining the freshness and texture of your treats. Store them in an airtight freezer bag for up to 3 months or in the fridge for up to a week. For the best experience, let them thaw for a few minutes before serving.
Freezing, Shelf Life, and Best Practices
Freezing is the optimal way to preserve these treats. Place them in an airtight container or freezer bag, ensuring no air exposure to prevent freezer burn. They can be stored in the freezer for up to 3 months and in the fridge for about a week.
When serving, allow the treats to thaw for about 5 minutes at room temperature. This ensures they retain their texture without becoming too soft. For an extra touch, drizzle with a little maple syrup or sprinkle with sea salt.
| Nutrient | Per Serving |
|---|---|
| Calories | 275 kcal |
| Protein | 9g |
| Carbohydrates | 18.8g |
| Fat | 17.3g |

Conclusion
Alright, so I need to craft a conclusion for this article about no-bake peanut butter oat cups. Let me start by understanding the requirements and guidelines provided.
First, the conclusion should be around 100-150 words and should effectively wrap up the article. I need to make sure it’s engaging and unique, avoiding any duplication from previous sections. Also, I have to be careful with certain keywords like “No-Bake”, “Peanut”, “Butter”, “Oat”, and “Cups” – using them no more than twice each.
I remember the user mentioned using SEO-optimized HTML content, so I should incorporate relevant keywords naturally. The keywords I need to focus on include “increment”, “syrup”, “seed”, “microwave”, “oven”, “print”, “instruction”, “chocolate peanut butter”, “mini muffin tin”, and “creamy peanut butter”. I have to distribute these without overstuffing.
The tone should be informational and in second person, addressing the reader directly. I should also ensure readability, keeping paragraphs short and simple. Flesch Reading Ease between 60-70 is the target, so I’ll need to keep sentences concise.
Looking at the bullet points, the conclusion should summarize the recipe process, encourage sharing on social media, and highlight the ease and versatility of the recipe. I should also mention the importance of following instructions, especially regarding the use of the microwave and avoiding the oven.
I’ll start by drafting a strong opening sentence that’s unique and different from the examples given. Then, I’ll touch on the key points: simplicity, versatility, sharing, precise instructions, and creative add-ins. I’ll make sure each paragraph is short, maybe 2-3 sentences each, to maintain readability.
I also need to include HTML tags like
for paragraphs and or for emphasis where needed. However, the user specified not to use H3 headings, so I’ll stick to plain paragraphs.
Finally, I’ll review the content to ensure keyword distribution is within the 2% density and that all prohibited actions are avoided, like passive voice and keyword stuffing. I’ll also check that the Flesch score is within the desired range.
Alright, putting it all together, here’s the conclusion: